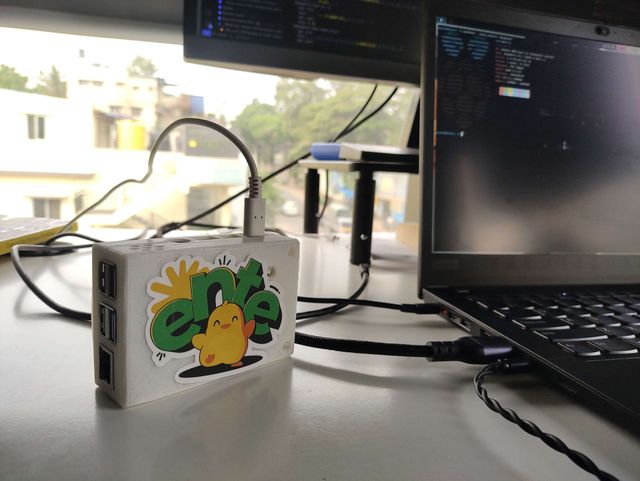
Unlike other photo storage platforms that require powerful servers to do face recognition, semantic search, video processing, etc., Ente pushes compute to edge devices because of its client side encryption. This lets museum - Ente's server side program to run efficiently on low-end devices. It enables hobbyist self-hosters to experiment with self-hosting without spending a lot of money on buying good high quality hardware. Folks from the community have been able to run Ente on Hobbyist Development boards like the Khadas Vim1 and Raspberry Pis.
Museum has a configurable yaml file where you can configure a lot of things related to your instance including SMTP, S3 buckets, DB, and much more.
In this guide, I'll walk you through deploying Ente on a Raspberry Pi 4
Model B with 2 GB RAM, please note that I will be doing everything on a 64-bit
Pi. If you do not know whether your Pi is 32-bit or 64-bit, know that any
Raspberry Pi above Model 3 are capable of running both 32-bit and 64-bit
operating systems. For this tutorial, please note that we won't be going too
much into details of building a museum.yaml for your instance, that is one of
the easily doable things. Also, the default configuration file will have most of
the things.
Configuring SSH
If you already have SSH configured, you can choose to skip this section.
SSH access can be configured while you're burning the SD Card with the Operating
System image itself. Install rpi-imager with your distributions package
manager.
# For debian
$ sudo apt update && sudo apt install rpi-imager
Once it is installed, open rpi-imager with sudo or admin privileges as it will
need admin privileges to make changes to the SD Card. Connect your SD Card to
the system and choose your Raspberry Pi Model in the UI. We went ahead with RPI
Lite 64 Bit because we do not need anything other than a command prompt.
Perhaps, a Desktop UI is unnecessary bloat in this case.
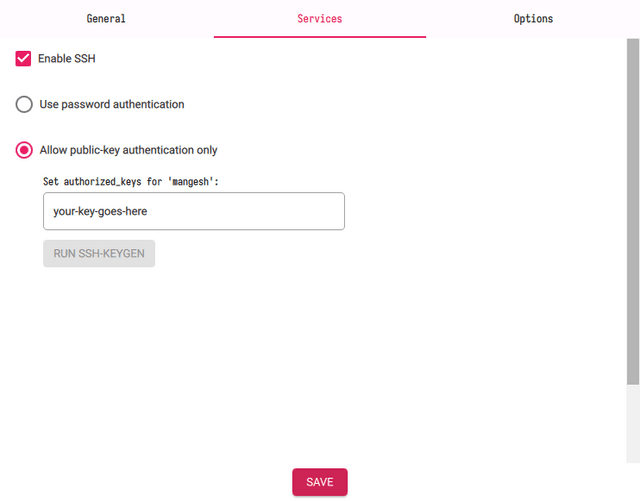
When you click on "Next" you'll see a prompt where you will be provided with an option called "Edit Settings". This section will mostly help you configure various system settings before burning the ISO itself. Go ahead and configure your System Hostname, WLAN. Then, move to the next section "Services". Check the options "Enable SSH" and "Allow public-key authentication only". This section needs to be filled with the public key you will generate.

In case you don't have a public key, let's generate a public key by using the below commands.
$ ssh-keygen -t ed25519 -C "my-raspberry-pi-name"NOTE
You can choose to use RSA key signing algorithm, but currently, ed25519 is more secure and recommended. Some interesting slow reads:
You will get a public key after executing the above command. Copy and paste it
in the authorized_keys empty field in the Imager App. And begin burning the
ISO to the SD Card.
To give some context, authorized_keys is a file created inside the
.ssh directory. This file contains public-keys of all the devices having
authorized access to your server/device via SSH.
If everything goes well, after booting up the Raspberry Pi, you should be able to ssh into the system with
$ ssh <hostname>@<your-ip>If you see any kind of "Connection failed" errors, know that the Raspberry Pi is not connected to Internet and hence that might be one of the most prominent reasons.
In order to get the IP Address, you can just do a simple curl ifconfig.me and
you'll get your IP Address.
Deploying Ente
We recently streamlined the process for Self Hosting Ente by optimizing a lot of things into the compose file providing the users with a single command to host Ente. So, this section should be one of the easiest to do :).
sh -c "$(curl -fsSL https://raw.githubusercontent.com/ente-io/ente/main/server/quickstart.sh)"The above command will create a directory my-ente which will include a
compose.yaml and a museum.yaml. The compose.yaml is for docker compose and
museum.yaml is Ente's server configuration file as explained initially. Check
out
local.yaml
for all possible configurations you can make.
Once you run the containers, go ahead and configure S3 buckets, and make any changes you feel you want to do. You can choose to set up a hardcoded-ott because when you create an account, Ente will ask you to provide a OTP. Now, you will not receive that OTP in your email because SMTP is not configured.
To tackle that situation, you can simply execute the below commands and find the OTP in logs.
$ cd my-ente
$ docker compose logs my-ente-museum-1
Nonetheless, reading the example
local.yaml
is a huge time-saver.
Configuring DuckDNS
Computer IPs are dynamic by nature, they will change whenever the Internet Service Provider (ISP) feels like it. Hence, we will be using DuckDNS as our Dynamic DNS (DDNS) client as we do not want to assume all readers have static IP included in their network configurations . If you don't know what Dynamic DNS is, then take an example of a baby duckling wandering in the pond while Mamma Ducky is keeping an eye on its duckling. Here, DuckDNS Client is the Mamma Ducky and duckling is your Raspberry Pi's IP Address.
Let's configure a "Mamma Duck" to keep a watch over her "duckling" in the pond.
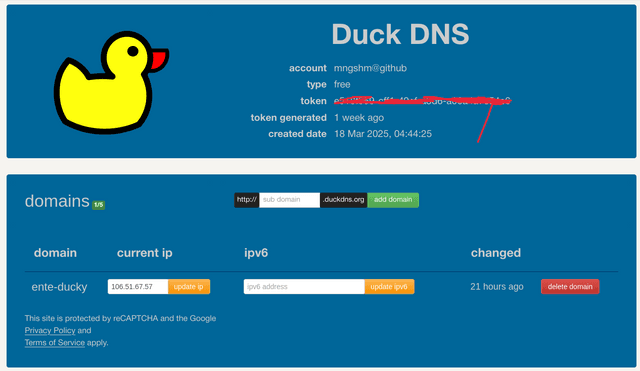
Head over to duckdns.org and create an account. After you
have an account, proceed with adding a name to the [your-domain].duckdns.org
subdomain. Once added, the DuckDNS client will give you a unique token which is
the important thing.

We will need cron to configure a scheduled job for DuckDNS to monitor changes in the IP Address. Make sure to install crontab on your Raspberry Pi.
For Debian, you can execute
$ apt update && apt install crontab curl
$ mkdir duckdns # to store the shell script and logs
Next, change the directory to duckdns which we created and create a new a file
duck.sh and dump the below command inside it.
echo url="https://www.duckdns.org/update?domains=<your-domain>&token=<token>&ip=<your-ip>" | curl -k -o ~/duckdns/duck.log -K -The above command does a very simple job: it sends a request to the /update
API with the domain name, your unique token and the system's remote IP to the
DuckDNS server. If successfully resolved the duck.log file will include a string
"OK" and if not it will have "KO".
Next, make it executable and perform a test request
$ chmod 700 duck.sh
$ ./duck.sh
Finally, the last step to set up DuckDNS is the cron job.
$ crontab -e # opens the fileGo ahead and copy the below line and paste it in the bottom of the opened file.
*/5 * * * * ~/duckdns/duck.sh >/dev/null 2>&1The above line will make sure that the duck.sh script is executed every 5
minutes. It's always best to have the shortest time interval as ISPs do not have
any defined schedule, they will update the IPs when they feel like it.
Port forwarding
A personal learning while figuring out port forwarding was how routers manage
traffic. Most routers in corporate offices (like ours) or even in general are
configured to block all incoming requests. For example, if I send a /ping it
will just block it. For this to not happen, you will have to either configure
your router to accept foreign incoming traffic/requests or simply redirect them
to the server or endpoint where the request will be accepted and processed.
The next step for you to configure is Port forwarding. Why is port forwarding
essential? It should be quite simple from the above explanation, routers or
local networks often run on IPs with prefix 192.168 are private IP's hence
they are not configured to resolve any kind of incoming traffic or requests. To
tackle this situation, you can search for how to configure port forwarding on
your routers admin dashboard. Feel free to skip to the next section if your
router already allows incoming requests.
While port forwarding is not the most secure way to do this but it still is efficient and a quick way to do this. Apart from port forwarding, another prominent solution is to setup a reverse tunnel or VPN for the requests to bypass the firewall or all the fuss in between.
Reverse Proxy
With everything done till now, you can use Ente already. But if you want to run Ente on your own domain (ente.mydomain.com) instead of my-ente.duckdns.org, you will have to additionally configure a reverse proxy.
You can pick any web server of your choice. To avoid manual certificate creation and management, we'll use Caddy in this post. Caddy manages certificates on its own which is less painful for the user (and perhaps the syntax is very simple).
{
	email your-email.com
}

api.ente.xyz {
	reverse_proxy localhost:8080
}

web.ente.xyz {
	reverse_proxy localhost:3000
}
Next, head over to your Cloudflare Dashboard and add a CNAME record targeting
towards the DuckDNS domain. What about the Cloudflare proxy? Sometimes this can
be tricky, you will have to choose wisely between orange cloud or grey
cloud. As orange cloud will proxy requests through Cloudflare's IPs
(172.x.x.x) and the requests might fail with 404's as they might not reach
your server IP on the right endpoint.
While I was writing this guide, I ran into similar issues. To find out what was
happening and what was the route for requests I used nslookup. With this, you
can exactly understand what IPs the request is passing going through.
nslookup api.ente.xyzThe flow for requests ideally should look like the below diagram.

That's it. All you are now left to do is, configure museum.yaml to your liking
and needs.
Wrap
"What I cannot create, I do not understand" - Richard Feynman
Lastly, make sure to understand whatever you're trying to do.
Learn more about self hosting Ente at help.ente.io/self-hosting, if you have any doubts feel free to drop a text in our Community Server.
If you like the progress we're making, spread the word.